Jan's Ceramic Creations Plus
  • Jan's Ceramic Creations Plus
  • New Arrivals
  • Bisque and/or Greenware
  • Cremation Urns
  • Parties and/or Classes
  • Location and Hours
  • Raku
  • Special orders
  • Blog
  • Store
  • Product

Happy camping

5/19/2017

5 Comments

 
Picture
Supplies-
    Retro camper bisque ( our store or a local ceramic shop)
    Acrylic-
         White
         Dark blue
         Black
         Light blue
         Yellow
         Red
         Orange
         Silver
       
         
Steps-
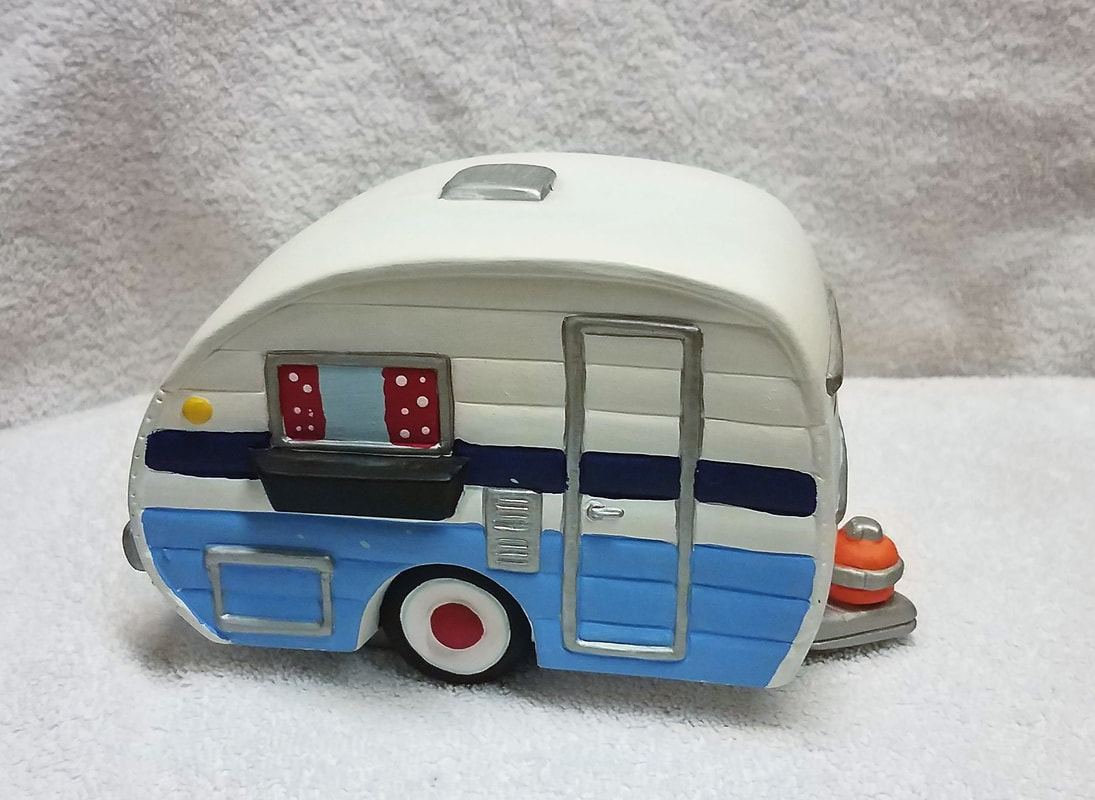
1. paint the whole camper white.  Make sure to check for all "white" spots.
2. paint the 3 lower stripes on both sides of the camper with light blue.  You may need two coats to cover well.
3. paint one stripe with the dark blue on both sides of camper.  It could the be next stripe up from the light blue or you can skip a couple of strips.  
4.paint a lighter blue in all 5 of the windows.  Make sure to get a nice even coverage in the small area that you are working with.
5. after the windows have tried take a pencil and draw lines to show how you want your curtains to look.  I drew straight lines to make it a bit easier for me. 
6.  paint red on the three small windows where your curtains are located.  You may two coats of red to get a nice even coverage.
7 after the red as dried you can put polka dots on the curtains.  You make even polka dots by using the but end of your brush as a "dotter" tool.  The windows on the end I made them look like val-era blinds.  You can do that by base coating the area with white then coming back with black and painting lines randomly over the white.
8.paint black under the window seal and the tires.
9 paint white on the outside of the rims of the tires, and red on the inside rim of the tires.
10. there are two small lights, one on each side, of the camper.  Paint them yellow.
11. the gas tank on the front of the camper is to be painted orange.
12. now I would check for any "white" spots or "boo boos" that may have occurred.
13. you need to now spray your piece really well. Let it dry.
14. lastly paint the trim of the door, windows, vent, front tongue, and top vent with silver.  paint two coats of silver.
Done.

5 Comments

REBLOG: They are creepy and crawly

8/19/2016

0 Comments

 
Picture
They creep and they crawl but this way they can make your night rather glowing.

Red spider with small holes-
    items needed:
        bisque spider with small holes cut out
        Duncan  OS 476 black
        Duncan OS 483 Real Red
        Duncan  OS 455 Holly Red
        Duncan  OS 449 Bright Red
        Duncan  OS 435 Dark Yellow
        Duncan  OS 431 White                                                                                    Duncan PL 233 Rich Ruby 
                                                                                   Red glitter
                                                                                   Matte spray
                                                                                   brush on gloss

Steps-
1. Base coat the whole spider black, both the bottom and the top.  Make sure there are no white spots.
2. Dry brush the whole bottom of the spider with Real Red first, Holly Red second, and Bright Red last.  (see tip at bottom for how to dry brush)
3. Base coat the eyes with Dark Yellow.
4. Paint a circle (pupil) on the eye
5. Outline eye with black and add a white highlight at the top right of each eye.
6.Paint the lines on the back with Real Red.  Make sure to paint in small sections, because while the paint is still wet you will need to sprinkle red glitter over the wet red paint.
7. After done with the red lines paint centers and the underneath of the black.
8. After black is dry paint a good coat of clear gloss over the black.
9 Spray the bottom of the spider with a matte spray.
10. Brush a thin coat of pearl red over the center of the back of the spider.

Picture
Picture
Purple spider with large hole-

Items needed:
Bisque spider with large holes cut out

Duncan OS 476 Black
Duncan OS 453 Grape
Duncan OS 452 Purple
Duncan OS 450 Lilac
Duncan OS 431 White
Duncan PL 184 Purple
Duncan OS 488 Christmas Green
Purple large glitter
Black small glitter
Matte spray


Steps:
1. Base coat whole spider with black, both the top and the bottom.  Make sure there are no white spots.
2. Dry brush the bottom of the spider with Grape first, Purple next, and Lilac last. (see tip for how to dry brush)
3. Base coat eyes with green
4. Paint a black circle (pupil) on the eye.
5. Outline with black, and then place a white highlight on the right side of the eye.
6. spray bottom of spider.
7. paint one thin coat of purple pearl over the center of the bottom of spider.
8. Paint the whole back black, top and underneath side.
9. Mix the purple glitter, and black glitter together.
10. Paint a second coat of black on the top side.  Make sure to work in small portions, because while the paint is wet sprinkle the glitter mix over the back.

Green Spider with large holes-
    Item needed:
        Bisque of spider with large holes
        Duncan OS 465 Holly Green
        Duncan OS 488 Christmas Green
        Duncan OS 464 Bright Green
        Duncan OS 463 Medium Green
        Duncan OS 476 Black
        Duncan OS 431 White
        Duncan OS 453 Grape
        Duncan UM 959 Green
        Green small glitter
        Matte spray

Steps:
1, Base coat whole spider with Holly Green, both top and bottom.  Make sure there are no white spots.
2. Dry brush the bottom of the spider with Christmas Green, next dry brush with Bright Green, and last with Medium Green. (see tip for how to dry brush)
3. Base coat eyes with Grape
4. Paint a black circle (pupil) on the eye.
5. Outline the eyes with black, and place a white dot (highlight) on the right upper corner of each eye.
6. spray bottom of spider
7. paint one thin coat of metallic green
8. paint the whole top with bright green, both top and underneath side.
9. paint the top of the back with a second coat of green, remembering to paint it in small sections and sprinkling green glitter over the wet paint.


Picture
0 Comments

Not your every day easter egg..

3/1/2016

0 Comments

 
Picture
The other day one of our students, a good friend, came in with an idea for an easter egg.  A minion easter egg.  A what?!  Well here are the pictures to prove that the average every day easter egg is not the same any more.
 
Supplies:

ceramic easter egg
acrylic blue (Mayco 459)
acrylic yellow (Mayco 434)
acrylic silver 
black sharpie pen
goggle eyes

1. wash and paint your whole egg yellow.  Yellow is more transparent and the blue will cover it up.

2. after the egg is dry take  type of painters blue tape, I use and tape it around the egg where the pants line will be.  Remember put the tape at the top of the pants, not below the pants line.  Now paint the bottom of your pants blue.

3. after the egg has dried again you will need to find something small and round.  We used a large pen bottom.  Dip the item (pen for us) into the silver paint and place two dots side by side on the top half of the egg.  This should look like little silver eyes.  Now you will need to spray your egg so that the paint is sealed.

4. set the egg aside to dry for a while.  After the silver is thoroughly dry you can glue your goggle eyes onto the silver dots.  Make sure to center them in the silver.

5. Last step is to add the bit of detail.  Using a black sharpie pen you will draw a black line between the blue and the yellow to mark their belts.  Then outline the silver dots, and draw a line around the top of the egg so the googles have a strap.  Then last between the eyes and the pants draw a mouth.  It can be a smile, an open mouth, or a frown.  This is all up to you.

Thank you Vickie Mayberry for sharing this idea and taking the time to make four of them to share.

Now you have your minion egg!  And the sky is the limit.  There are so many possibilities.  Don't let us stop you.  I would love to see your eggs and the ideas you can come up with.

0 Comments

January 08th, 2016

1/8/2016

0 Comments

 
Picture
It is a season of new love, and spending time with sweetheart.  Feburary is the month of love. It is a chance to take your sweetheart out for a unique date.  And I have the idea for you!

Take a night and bring them to our shop.  I know that sounds crazy but it is a great idea.  It is a chance for you and your loved one to create something beautiful together.  

There are so mam different ideas.  You can make each other a mug to use.  Then when you are away you can think of each other fondly.  Or you can create something all new!!

You might think I am nuts, so be it.  But just before Christmas we had a young couple come in for an evening of fun.  They brought their dinner and sat at our back table.  Each one made a project for the other.  It gave them a chance to talk, and just spend time together.  As a person watching from the outside, it was really sweet.

We have another couple that comes in on more of a regular basis.  They have not painted things they have created their own projects, bowls to be exact.  The first one was in the shape of an eggplant.  The husband molded it, and the wife painted it.  It was, again, really fun to watch.  They created something together that they can use, and think of each other when it is on the table.  Plus it is a definite conversation starter!

So as you start to think about what you will do next month for Valentines Day think of us.  You can come in spend a fun filled evening make a project to enjoy together and have some fun will completing it!

0 Comments

RAKU

9/24/2015

0 Comments

 
0 Comments

Trade shows

1/29/2015

0 Comments

 
0 Comments

Remember when...

1/13/2015

3 Comments

 
Picture
Picture compliments of Esty.com
I snagged this picture from the internet because in reality we don't have anything like it around the shop.  But I was shocked yesterday when I was reading Country Living and they had an article on how the "sponged" look is coming back this year.  SHOCK!!
Do you remember when everyone was making dishes like the ones up above?   I do.  If my memory serves me right it was the mid 90's, and our shop was kind of new.  The biggest thing to do was "sponge" your dish set or whatever item you were working on.  It was easy, fun and came out looking like a true professional did the work.  Something you could really be proud of.  

Now I don't know about you, but I think it is a good thing to come back into style, at least for awhile.  Sponging your projects is a easy fun way to create all over color.  You can use different sizes, shapes and textures.  You can also put your color in a limited space or all over the pieces.  You can use one color or you can use a multitude of color.  

The one thing I know about this technique is it is versatile and easy.  What I recommend you do the next time you need a birthday gift or a wedding gift or even mom's day gift (you know that date is around the corner!), come into the shop.  We have a good variety of piece you can use with this technique.  Plus we have different styles of sponges and a rainbow of colors to choice from.  Plus we can show you how to combine this technique with another, like solid color glazing.

Till next time- paint on.


3 Comments

RAku is back!

12/4/2014

0 Comments

 
Do you need a last minute Christmas idea that is on the unique side?  Or do you have someone in your life that everything they need and just really hard to shop for?  Here is a great idea for you... RAKU

Dec. 13 we will be offering our Raku class again this year.  But it is different in the fact that we are offering in the winter time, usually only offered in the summer, and we are going to be offering horse hair again.  Now you are probably wondering what horse hair is?

I have done a post on what Raku is, and shown your the traditional form of  Raku.  But this past year we have added a new element to our Raku class, horse hair.  Horse hair is where you take actual horsehair and burn it into the piece of ceramic.  Cool?!  Definitely different.  

So..........Saturday December 13 we will be offering both traditional Raku firing and horse hair firing.  It is a lot of fun, and a great last minute Christmas present for the special one in your life or just the great friend at work.

Class will start at 9:00 am, and will be continue until 2:00 pm.  Most, if not all, projects will be fired that day and will be able to take home on that day.  If not that day you will be able to pick them up on Monday December 15.

The cost for the class does vary.  The cost depends on the project that you choice to work on.  May it be a vase, Christmas ornament, a little nick knacky piece or just something different that catches your eye we have it all.

The most important thing of all this is to remember  Saturday Dec. 13 at 9:00 am at Jan's Ceramic Creations Plus we are doing Raku with Horse hair firing.  Hope to see you there!
Picture
Picture
0 Comments

Snow Fairies

10/30/2014

3 Comments

 
Picture
We have added these cute little snow fairies to our collection this year.  There are two boy fairies, one standing and one sitting.  There are two girl fairies, also one standing and one sitting.  

They are a cute addition to anyone's shelf.

The technique:
Snow fairy boy standing

light blue       Mayco 331                           med. brown  Duncan 472 
white   Duncan 431                                    flesh  Duncan 441
med. blue  Duncan 459                            black Duncan 476
pink  Duncan 446                                      sliver Duncan 956
dark red  Duncan 480                               green metallic Duncan 959
small Christmas tree lights(blue)            glitter
Optional- crystal in the hand.

When I am painting pieces that have solid colors like this fairy I start with the largest area and work to the smallest area.

1. Paint the shirt, hat, and shoes with light blue.   You may need two coats depending if there are brush strokes.  If the first coat is uneven place a second coat of light blue.
2. Paint the trim of the shirt, the gloves, and the leggings with the med. blue.  Again you may need two coats.
3.Paint the gift behind his legs with a dark red.  Again you may need two coats.
4. Paint the wings, trim and ball of hat, cuffs of sleeves and shoes with white.
5. Paint the face with flesh and hair with med. brown
6. Paint the eyes next.  Base coat the eyes with white, and then place a small black dot, making sure to touch the top of the eye with the black, in the eye.  Then place a white dot in the left corner of the black circle of the eye.  
7.  Now take the black with a small thin brush outline the eyes with black and place eyebrows just above the eye.  See picture below for example.
Picture
8. Take a bit of the pink paint and place it on your brush and then rub most of the color out of your brush onto  towel.  (This technique is drybrushing).  Then dab just a bit of color on his cheeks just as you see in the picture above.
9. Now you need to seal your fairy with a spray.  It could be any ceramic spray or sealer spray. The most important thing to remember is it needs to be matte NOT SHINNY.
10. Spraying your piece you need to paint a metallic green on the bow of the package, and place little green dots on the package.

Picture
11. Take the silver with the fine brush and out line the wings just as you saw in the picture above.
12. Lastly you will need the white acrylic and glitter.  Brush a thin coat of white over the trim of hat, gloves, and shoes.  Before the white dries shake a bit of the glitter of the top of the fairy.  I recommend you work in small areas and with a piece of paper under your piece to catch the extra glitter that will fall off your piece.
13.  Now that you are done with all the painting of your piece you can take the small blue Christmas tree lights and break of the backs.  You will be gluing them onto the wings.  See the pictures above for guidance of where to place the lights.  
14.  The last option is to purchase a small crystal to place in his hand.  If you don't want to have that kind of expense you can take Elmer's glue and then place a small pile of glitter in his hands instead.
15. DONE!!

And remember this is only our ideas.  Take our ideas and run with your own.  You can use any colors and color combinations.  We would love to see your ideas of how you would do these darling fairies.  

Share your pictures at our facebook page- Jans-ceramic-creations-plus

Enjoy!  If you want the technique and colors for the other three fairies please email us at jansceramic@msn.com.
3 Comments

pumpkin patch

10/9/2014

0 Comments

 
Picture

Your own little pumpkin patch


You can create your own little pumpkin patch with these pumpkin noggins from Dona mold company.  There are 8 unique personalities to brighten your day.  You can place them on your desk at work, in the window of your kitchen, or brighten someone else's day with a pumpkin friend.

The project sheet:
Supplies:
      Bisque pumpkin kit      Black pipe cleaners
      Orange                           Antiquing
       Black                              Duncan Spray Porclien
       Green                             Pink Chalk
       White

For all pumpkins-
 
Step one- paint all of the pumpkin skin with Orange

Step two- paint the top piece with Green and paint tongue Red

Step three- spray all the pumpkins with a sealer (Duncan porclien)

Step four- antique the pumpkins with an oil based brown (Doc Holiday 

Step five- The eyes- base coat all eyes first with White, then place a large circle of color, Green, in the center of the eye.  Make sure to touch the top of the eye. Then put a Black circle in the center of the color.  Last outline the eyes with black and placing lashes on the edges if desired.

Step six-  Outline mouths and fill in open mouths with Black

Step seven- Last you need to blush the cheeks with pink chalk.

Step eight- shoes- base coat shoes and hands white.  Then paint bottoms of shoes and cuff of hands with Black.  Lastly outline the shoes with Black.

Step nine- your pumpkins, shoes, and hands need a final spray 

Step ten- putting the pumpkin together- take the small pieces of black pipe cleaners. (4 pieces about 2 inches long) and glue them into the hands and shoes.  Once dry then glue the hands and shoes into the pumpkin.  Make sure to check for a right and a left!


If you are interested in the Pumpkin kits you can check them out in our shop or even closer on our website.
Picture
0 Comments
<<Previous

    Author

    New and creative ideas that come to mind.  Something to hence someone

    Archives

    May 2017
    August 2016
    March 2016
    January 2016
    September 2015
    January 2015
    December 2014
    October 2014
    October 2013
    September 2013

    Categories

    All

    RSS Feed

Proudly powered by Weebly