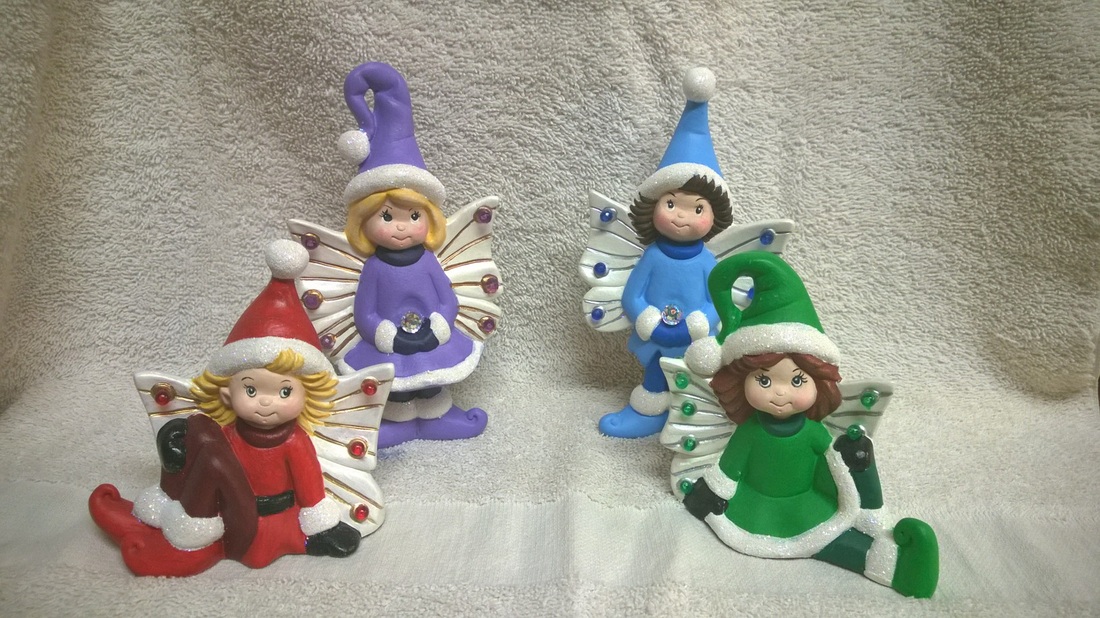
We have added these cute little snow fairies to our collection this year. There are two boy fairies, one standing and one sitting. There are two girl fairies, also one standing and one sitting.
They are a cute addition to anyone's shelf.
The technique:
Snow fairy boy standing
light blue Mayco 331 med. brown Duncan 472
white Duncan 431 flesh Duncan 441
med. blue Duncan 459 black Duncan 476
pink Duncan 446 sliver Duncan 956
dark red Duncan 480 green metallic Duncan 959
small Christmas tree lights(blue) glitter
Optional- crystal in the hand.
When I am painting pieces that have solid colors like this fairy I start with the largest area and work to the smallest area.
1. Paint the shirt, hat, and shoes with light blue. You may need two coats depending if there are brush strokes. If the first coat is uneven place a second coat of light blue.
2. Paint the trim of the shirt, the gloves, and the leggings with the med. blue. Again you may need two coats.
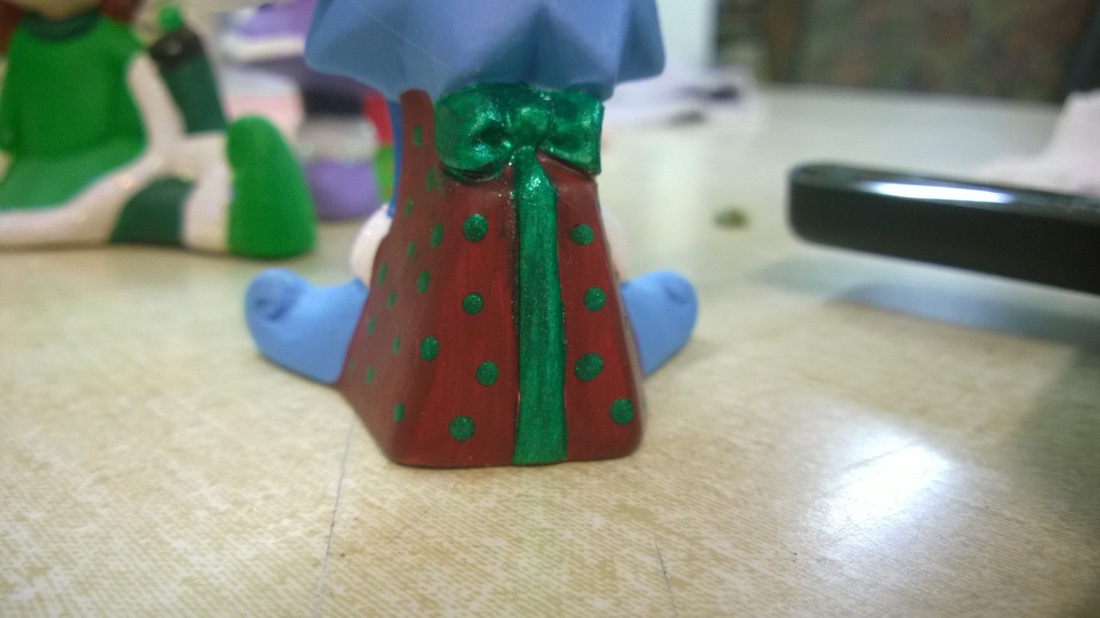
3.Paint the gift behind his legs with a dark red. Again you may need two coats.
4. Paint the wings, trim and ball of hat, cuffs of sleeves and shoes with white.
5. Paint the face with flesh and hair with med. brown
6. Paint the eyes next. Base coat the eyes with white, and then place a small black dot, making sure to touch the top of the eye with the black, in the eye. Then place a white dot in the left corner of the black circle of the eye.
7. Now take the black with a small thin brush outline the eyes with black and place eyebrows just above the eye. See picture below for example.
They are a cute addition to anyone's shelf.
The technique:
Snow fairy boy standing
light blue Mayco 331 med. brown Duncan 472
white Duncan 431 flesh Duncan 441
med. blue Duncan 459 black Duncan 476
pink Duncan 446 sliver Duncan 956
dark red Duncan 480 green metallic Duncan 959
small Christmas tree lights(blue) glitter
Optional- crystal in the hand.
When I am painting pieces that have solid colors like this fairy I start with the largest area and work to the smallest area.
1. Paint the shirt, hat, and shoes with light blue. You may need two coats depending if there are brush strokes. If the first coat is uneven place a second coat of light blue.
2. Paint the trim of the shirt, the gloves, and the leggings with the med. blue. Again you may need two coats.
3.Paint the gift behind his legs with a dark red. Again you may need two coats.
4. Paint the wings, trim and ball of hat, cuffs of sleeves and shoes with white.
5. Paint the face with flesh and hair with med. brown
6. Paint the eyes next. Base coat the eyes with white, and then place a small black dot, making sure to touch the top of the eye with the black, in the eye. Then place a white dot in the left corner of the black circle of the eye.
7. Now take the black with a small thin brush outline the eyes with black and place eyebrows just above the eye. See picture below for example.
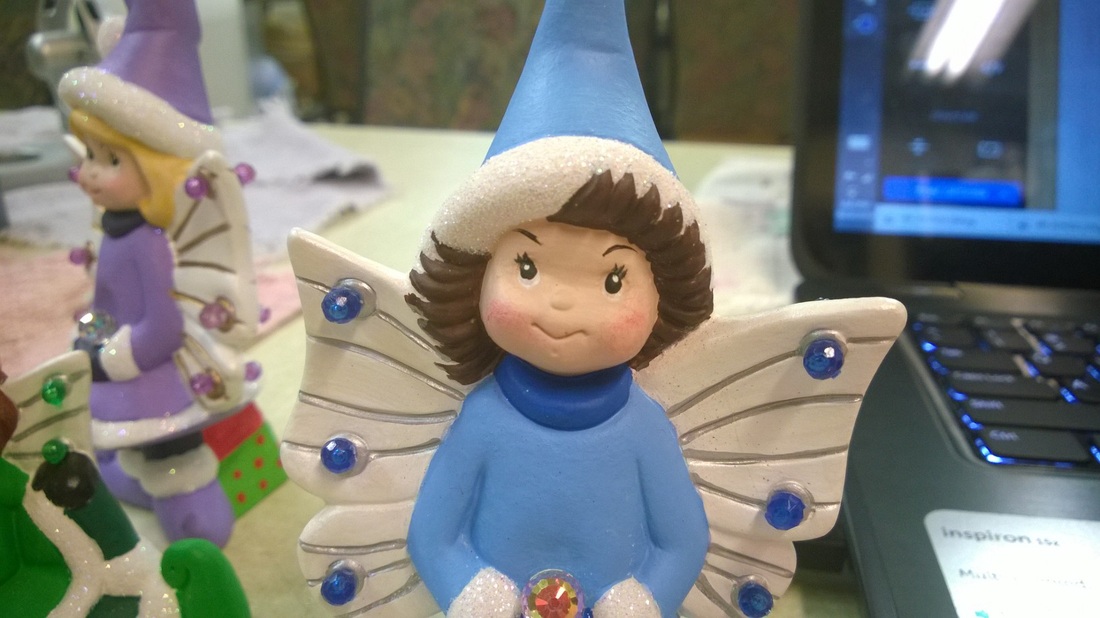
8. Take a bit of the pink paint and place it on your brush and then rub most of the color out of your brush onto towel. (This technique is drybrushing). Then dab just a bit of color on his cheeks just as you see in the picture above.
9. Now you need to seal your fairy with a spray. It could be any ceramic spray or sealer spray. The most important thing to remember is it needs to be matte NOT SHINNY.
10. Spraying your piece you need to paint a metallic green on the bow of the package, and place little green dots on the package.
9. Now you need to seal your fairy with a spray. It could be any ceramic spray or sealer spray. The most important thing to remember is it needs to be matte NOT SHINNY.
10. Spraying your piece you need to paint a metallic green on the bow of the package, and place little green dots on the package.
11. Take the silver with the fine brush and out line the wings just as you saw in the picture above.
12. Lastly you will need the white acrylic and glitter. Brush a thin coat of white over the trim of hat, gloves, and shoes. Before the white dries shake a bit of the glitter of the top of the fairy. I recommend you work in small areas and with a piece of paper under your piece to catch the extra glitter that will fall off your piece.
13. Now that you are done with all the painting of your piece you can take the small blue Christmas tree lights and break of the backs. You will be gluing them onto the wings. See the pictures above for guidance of where to place the lights.
14. The last option is to purchase a small crystal to place in his hand. If you don't want to have that kind of expense you can take Elmer's glue and then place a small pile of glitter in his hands instead.
15. DONE!!
And remember this is only our ideas. Take our ideas and run with your own. You can use any colors and color combinations. We would love to see your ideas of how you would do these darling fairies.
Share your pictures at our facebook page- Jans-ceramic-creations-plus
Enjoy! If you want the technique and colors for the other three fairies please email us at [email protected].
 RSS Feed